
Contents
MailVault Outlook Add-in Access
Logging on to MailVault Email Add-in
Logging
in to the MailVault Mobile Web Interface
Bookmarking the Mobile Web Site
Creating
a Bookmark on Android Devices
Creating
a Bookmark on Blackberry Devices
Creating
a Bookmark on IOS (IPhone, IPad) Devices
Creating
a Bookmark on Windows Phone Devices
Accessing MailVault Web Access
Search Criteria under "Extended Search"
Search Criteria under "General"
Search Criteria under "Extended"
Previewing
via the Outlook Add-in
Previewing
via the Web Interface
Opening
Email in Email Application
Restoring via the Outlook Add-In
Restoring via the Web Interface
MailVault
Outlook Add-in Access
MailVault users can access their archives using a convenient add-in for Microsoft Outlook.
Requirements
You must be running one of the following versions
of Outlook:
§ Outlook 2003
§ Outlook 2007
§ Outlook 2010
§ Outlook 2013
Depending on what version of Outlook you have
installed, you may either see an additional toolbar (up to Outlook 2007) or and
additional Tab (2010 and onwards).

Image:
MailVault toolbar in Microsoft Outlook 2007
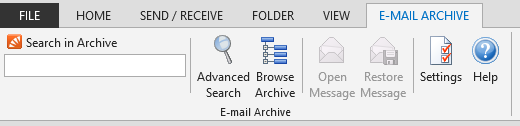
Image:
MailVault tab in Microsoft Outlook 2010
Logging
on to MailVault Email Add-in
If the MailVault Outlook Add-in is not
pre-configured, you will be asked to log in to MailVault Server as soon as you
click any button in the MailVault Outlook Add-in.
Please enter the following
details:
§ Server Name: https://mailvault.appcentre.net/<customer
name>
§ Authentication: Standard
Authentication
§ User Name: <Your
Username>
§ Password: <Your
Password>
Tick the “Remember Password”
box if you do not wish to be prompted for your credentials each time you access
the archive after starting up Outlook.

MailVault
Mobile Access
MailVault users can access their archives using a supported browser on their tablet/smartphone.
Requirements
Stock web browsers on the following platforms are
officially supported:
·
Apple iOS 3.2 or higher
·
Android 2.3 or higher
·
Windows Phone 7.5 or higher
·
Blackberry 7 or higher
Logging in to the MailVault Mobile Web Interface
Unless MailVault Server is configured otherwise, users can access MailVault Mobile Web Access using the following internet addresses:
https://mailvault.appcentre.net/<customer name>/web/m
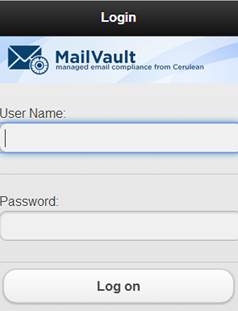
To log in to MailVault Mobile Web Access, please enter the following details:
§ User Name: <Your Username>
§ Password: <Your Password>
Bookmarking
the Mobile Web Site
To avoid entering the internet
address into your tablet/smartphone browser each time you need to access the
archive, you can bookmark the URL as a link on your home screen.
Creating a Bookmark on Android Devices
Please note: Due to the
variety of customized Android devices. The instructions below may not correctly
reflect all the steps you need to follow. Please refer to the manufacturer’s
manual in these occasions.
1. Open up the default Android web browser
2. Browse to https://mailvault.appcentre.net/<customer
name>/web/m
3. Click on the Android Menu button
4. Select “Add Shortcut”
5. Return to your home screen and you should find a bookmark called
“MailVault”
Creating a Bookmark on Blackberry Devices
BlackBerry 7
1. Open up the default Blackberry web browser
2. Browse to https://mailvault.appcentre.net/<customer
name>/web/m
3. Press the Blackberry button
![]()
4. Give the bookmark a name
5. Select the location where you would like the bookmark to be created
6. Click “add”
7. Browse to the location you selected in step 4 and you should find a bookmark
with the name you selected at step 3
Blackberry 10
1.
Open up the default Blackberry
web browser
2.
Browse to https://mailvault.appcentre.net/<customer
name>/web/m
3.
Press the Blackberry Action
key
![]()
4.
Click on “Add to Home Screen”
5.
Return to your home screen and
you should find a bookmark called “MailVault”
Creating a Bookmark on IOS (IPhone, IPad) Devices
1. Open Safari
2. Browse to https://mailvault.appcentre.net/<customer
name>/web/m
3. Click on the IOS Share button
![]()
4. Click on “Add to Home Screen”
5. Give the bookmark a name
6. Click on “Add”
7. Return to your home screen and you should find a shortcut with the name you entered in step 5
Creating a Bookmark on Windows Phone Devices
1. Open up Internet Explorer
2. Browse to https://mailvault.appcentre.net/<customer name>/web/m
3. Click on the options button
![]()
4. Click on “Pin to Start”
5. Return to your home screen and you should find a bookmark called “MailVault”
MailVault
Web Access
MailVault users can access their archives using a supported browser.
Requirements
The following web browsers are officially supported
by MailVault Web Access:
·
Apple Safari 3 or higher
·
Google Chrome
·
Microsoft Internet Explorer 8 or
higher
·
Mozilla Firefox 3 or higher
·
Opera 9 or higher
Accessing
MailVault Web Access
Users can use the following internet addresses to
access MailVault Web Access:
https://mailvault.appcentre.net/<customer
name>
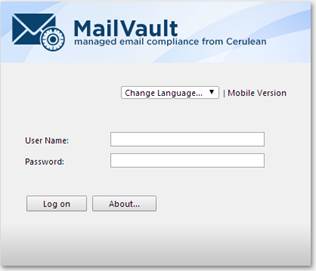
To login to MailVault Web Access, please enter the following
details:
§ User Name: <Your
Username>
§ Password: <Your
Password>
Now please click Log on.
Searching Your Email Archives
Mobile Search
Search
by Folder Structure
·
After login, a list of all
readable user archives appears.
·
To open a user archive or a
folder, simply tap on it.
·
To return to the previous screen,
tap on the Back button in the upper left corner.
·
To view the emails in a folder,
tap on emails in the folder.
·
To view an email, simply tap on
it.
|
|


Full Text Search
·
To search for a specific keyword,
first go to the archive to be searched. (Subfolders are included in the
search).
·
Tap on Search.
·
Enter the keyword and tap on Search
again.
·
The search results are displayed.
·
To view an email, simply tap on
it.
|
|


MailVault Web Access makes the archive accessible through an internet browser. This way, important functions such as browsing and viewing archived emails can be made available under any system and without having to install additional software.
Web/Outlook Search
Search
by Archive Folder
User
Archives
The folder My Archive contains all emails
that were archived from your mailboxes. If you have read-access to the archives
of additional users, their emails are located in the folders labeled Archive
of <user name>. e.g.

Display
of Emails in a Folder
To view
the emails of a specific folder, simply click on the folder name. The emails
are listed below the tree structure.
Quick Search
With quick search you can browse all emails located
in the archives you have access to. This feature is especially suitable for
simple queries; alternatively, the extended search can be used (see below).
Using Quick Search
The input field is located in the upper part of
MailVault Web Access or in the MailVault Outlook Addin.
![]()

(Outlook Add-in Quick Search)
![]()
![]()
(Web Access Quick Search)
Simply enter one or more keywords and press ENTER.
The search results are displayed. Keywords which appear in the header or the
subject line are highlighted.
Searching
for Word Fragments
To display all emails containing a word beginning
with a particular fragment, use the wildcard character (*). For example:
auto*
will return auto, automatic, automobile etc.
Searching
for Phrases
To search for words appearing consecutively and in
a specific order, use quotation marks (""). For example:
"Microsoft Windows"
will return the text Microsoft Windows but not
Microsoft Works or Windows 95.
Narrowing
by Fields
A search for keywords or phrases can be limited to
specific fields. For example:
subject:News only in Subject
from:john@mailVault.appcentre.net only in From
to:michael@mailVault.appcentre.net only in To
cc:lisa@mailVault.appcentre.net only
in Cc
bcc:customers@mailVault.appcentre.net only in Bcc
Excluding
Words
To narrow a search, you may want to specify words
which must not be present in the emails. To exclude words from the search
results, prepend the word with the minus character (-). For example:
Cerulean -download-tip
returns all emails containing Cerulean which do not
contain download-tip.
Combining
Search Options
Any of the search options described above can be
combined. For example:
Cerulean -"Daily Update"
returns all emails containing Cerulean which do not contain the consecutive
words Daily Update.
Advanced Search
The advance search allows you to build more complex
search queries such as the date and size of the email(s).
Using the Advanced
Search
In the upper part of the MailVault Web Access and
the Outlook Add-In, click on Advanced Search and enter the search
parameters.
![]()

![]()
![]()
The search criteria are cumulative, i.e. the search
returns only those emails satisfying all criteria. Click on Search to
start the search.
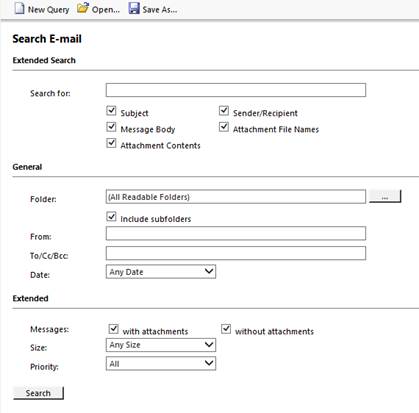
Search Criteria under
"Extended Search"
Enter a keyword or phrase into the text field, and
specify where MailVault is to direct the search. The following options are
available:
·
Subject - The subject line of the email is searched.
·
Sender/Recipient - The fields "From", "To", "Cc", and
"Bcc" are searched.
·
Message body - The text-only or HTML sections of the email are searched (depending
on availability).
·
Attachments File Names - The file names of the email attachments are searched.
·
Attachment Contents - The contents of the email attachments are searched. If and to what
extent attachments can be searched depends on the indexing options specified
(under Administrative Tools).
In the textfield Search for, all options
described in section Quick Search, such as phrases and wildcards, are available
here as well.
Search Criteria under
"General"
Under General, the following options are
available:
·
Folder - The folder to be searched by MailVault can be selected here. By
default, this is the main folder of the current user. By clicking the button to
the right of the text field, folders can also be selected using the folder
structure. As administrator, the folders of all users can be searched.
·
Include subfolder - If selected, MailVault not only searches the selected folder (e.g. Inbox),
but all subfolders created therein (e.g. Inbox / Projects 2008 / Profit
Optimization) as well.
·
From -
Any keywords or email addresses entered here are searched for only within the
email's sender field.
·
To/Cc/Bcc - Any keywords or email addresses entered here are searched for only
within the email's recipient fields.
·
Date -
The timeframe the search is to cover can be selected here. Either a predefined
range, such as Yesterday or This year, can be selected or, by
choosing Custom, a specific period can be specified manually. In this
case, the start and end dates will be included.
In the fields From and To/Cc/Bcc, all
options, such as phrases and wildcards, described in section Quick Search are
available.
Search Criteria under
"Extended"
Under Advanced, the following options are
available:
§ Messages with/without attachments -
By default, all messages are searched, regardless of whether or not they have
any file attachments. Clear one of the check boxes to remove certain emails,
such as those without attachments, from the results.
Important: These searches can be imprecise at times because
items like background pictures could be regarded as attachments.
§ Size - By default, all messages are searched regardless
of their size. Use the appropriate fields provided to limit the search
according to the size of the emails, e.g. at least 5 MB or between 400
and 600 KB.
§ Priority - Emails are searched according to the priority
level of the email as assigned by the sender. When choosing Low, all
emails with a priority level lower than Normal are returned, when
choosing High, all emails with a priority level higher than Normal are returned.
Emails not containing any information regarding priority are assumed to have a
priority level of Normal.
Starting a Search
Click on Search to start the search. The
results are displayed in a list.
Refining the Search
Results
To narrow the results after a search has been
executed, click on Advanced Search again, enter additional search
criteria and click on Search.
Starting a New Search
To start a new search, click on New Query.
All search criteria will be reset to their default values (i.e. no
restrictions; the search covers all folders of the current user).
Saving a Search
Search criteria that are used repeatedly (such
as "all receipts from the last month") can be saved and reused at any
time. Click on Save As... and choose a meaningful name for the search. Click on
Open to access, edit or restart the search.
Previewing Emails
Previewing via the Outlook Add-in
To view an email which was returned by one of the
search functions described above, simply click on it. A preview of the email is
displayed on the right side of the screen.

Please keep in mind that images and any formatting
will not be displayed in the preview for security reasons. Emails cannot be
forwarded or replied to within the preview, either.
For a comprehensive view of an archived email and
the ability to use all the Microsoft Outlook features such as printing,
forwarding and replying, click on Open message in the MailVault Outlook
Add-in.


The email will be loaded from the archive and
displayed, either immediately or after a few seconds depending on size.

Previewing via the Web Interface
To view an email which was returned by one of the
search functions described above, simply click on it. A preview of the email is
displayed on the right side of the screen.
Please keep in mind that images and any formatting
will not be displayed in the preview for security reasons. Emails cannot be
forwarded or replied to within the preview, either.
Opening Email in Email Application
In the toolbar above the email preview, two buttons
are available: Open in Microsoft Outlook (MSG) and Open in Email Client
(EML).
![]()
If you have Outlook installed or a mail client
which can open .EML files, you can view these emails as you would any message
in your default Mail client. You will also gain the ability to respond or
forward the archived email.
Printing
the Displayed Email
In the toolbar above the email preview you can find
the function Print.
![]()
By clicking on this button, you can print the
displayed message. The print out will also include the message header i.e. To,
From, Subject…..
Internet
Headers
In the toolbar above the email preview click on Internet
Headers...
![]()
This will display the internet headers of the
current message as well as all MIME parts.
Restoring
Emails
Restoring
via the Outlook Add-In
To restore an archived email which is no longer in
your mailbox to Outlook, please proceed as follows:
·
Locate the email within the
archive and open it.
·
 In the MailVault Outlook Add-in, click on Restore Message.

·
Drag and drop the envelope icon
into an Outlook email folder or a Windows Explorer file system folder.

·
The email is restored immediately
or after a few seconds, depending on its size.
Restoring
via the Web Interface
![]() In the toolbar above the email preview you can find the function Restore
to Mailbox.
In the toolbar above the email preview you can find the function Restore
to Mailbox.
![]()
Once you click on this button a new window will pop up prompting you to an
email address. Please enter the address of the mailbox you would like to
restore the email to.
